|
|||
|
|
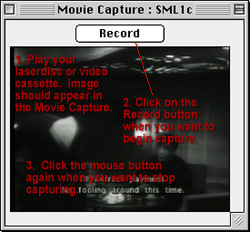
Adobe Premiere is a video editing program. Here is the procedure for capturing from video cassette or laserdisc (to see instructions with images see: Detailed Instructions). 1. Turn on laserdisc player or video cassette player. Chose laser 2. Quit most other programs currently running (except DragStrip and the browser running these instructions) 3. Open Adobe Premiere and Chose 640x480 uncompressed 4. Under File, chose Preferences > Scratch Disk / Device Control. 5. Under File, chose Capture > Movie Capture. You should now see your video in the Movie Capture window.
If you do not see it, check the following settings:
7. Chose the in and out points of the clip you captured. 8. To save the clip, chose File > Export Movie. To save the clip, chose File > Export Movie. Make sure the export settings are: 640x480, 29.97 fps without compression, and the audio is 44100 Khz, 16 bit Stereo and make sure the drive you save to has enough space on it to fit your movie. To edit the start and end points of your clip and get a screen shot of your movie, open the movie you saved with QuickTime and do the following (for text-only instructions see: Text Instructions): 1. Navigate to the points before or after sections you want to delete 2. Move the triangles so the the section to be deleted is in grey. 3. Chose Edit > Cut to delete this grey area. 4. Navigate to a screen shot you want to save. 5. Chose File > Export. and chose as Export settings Movie to Picture, uncompressed. 1. Open this file you exported with Adobe Photoshop. Crop the image to get the portion of the screen shot you want to use. 2. Reduce the image size (Chose Image > Image Size) to 110 pixels high 3. Chose Save a copy and save as a jpeg.
|
||
|
Image Manipulation | Page
Layout | Audio & Video | Animation
| Foreign Languages
Web Courses | links | Home This site is maintained by Alex
Chapin
|
|||